# 线程基础
作者:Ethan.Yang
博客:https://blog.ethanyang.cn (opens new window)
并发编程相关代码仓库 (opens new window)
# 一、什么是线程?
在 Java 并发编程中,线程和进程是核心概念,它们决定了程序的执行方式:
- 进程(Process):程序在操作系统中的一次执行活动,是系统进行资源分配和调度的基本单位。每个进程都有独立的内存空间和系统资源。
- 线程(Thread):线程是进程中的一个执行路径,一个进程至少包含一个线程。多个线程共享进程的资源,但每个线程都有自己的运行环境。
操作系统在分配资源时,会将资源分配给进程,而 CPU 资源是直接分配给线程的,因此 线程才是 CPU 资源分配的基本单位。
在 Java 中,当我们启动 main 方法时,实际上是启动了一个 JVM 进程,其中 main 方法所在的线程被称为主线程(Main Thread)。
# 二、进程与线程的内存结构
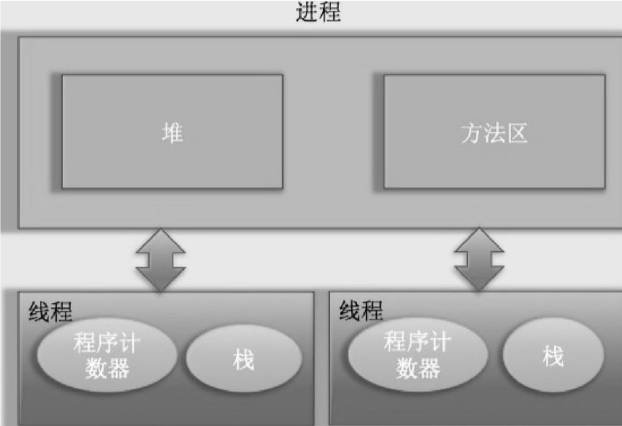
从上图可以看出,一个进程可以包含多个线程,并且线程之间共享进程的部分内存结构:
| 内存区域 | 作用 |
|---|---|
| 程序计数器(PC Register) | 记录当前线程执行的字节码指令地址,方便 CPU 线程切换时恢复执行状态。 |
| 栈(Stack) | 存储线程的局部变量、方法调用栈帧(Frame),是线程私有的。 |
| 堆(Heap) | 进程创建时分配,主要存放 new 创建的对象实例,所有线程共享。 |
| 方法区(Method Area) | 存储 JVM 加载的类信息、常量、静态变量等,所有线程共享。 |
这些内存区域的划分有助于 JVM 实现高效的并发管理,同时避免线程之间的不必要干扰。
# 三、线程的基础API
# 创建与运行
在 Java 中,创建线程主要有三种方式:
# 继承 Thread 类
public class _01CreatThread {

    public static class extendThread extends Thread{
        @Override
        public void run() {
            System.out.println("通过继承Thread类创建线程");
        }
    }

    public static void main(String[] args) {
        extendThread t1 = new extendThread();
        // 调用start后, 线程进入就绪态, 等待cpu调度
        t1.start();
    }
}
2
3
4
5
6
7
8
9
10
11
12
13
14
15
# 源码分析
start()方法(Thread类源码核心):public synchronized void start() { // 0代表线程是 NEW 状态 if (threadStatus != 0) throw new IllegalThreadStateException(); group.add(this); // 将线程加入线程组 start0(); // 本地方法,真正创建线程并调用 run() threadStatus = 1; // 标记线程已启动 }1
2
3
4
5
6
7
8start0()是 native 方法,底层由 JVM 调用 OS 原生线程创建机制,最终会执行run()方法。run()方法@Override public void run() { // 只是检测是否有任务对象 if (target != null) { target.run(); // target 是实现 Runnable 的对象 } }1
2
3
4
5
6
7所以如果重复调用
run()原有线程会重复执行任务, 并不会创建新线程; 但是重复调用start()会抛出异常, 因为会先判断threadStatus是否为0;
所以整个调用流程是这样
Java 代码调用
start()→ JVMThread.start()JVM
start0()→ OS 创建本地线程OS 调度线程 → 执行 JVM 回调 →
run()
# 实现 Runnable 接口
public class _01CreatThread {

    public static class implementRunnable implements Runnable{
        @Override
        public void run() {
            System.out.println("通过实现Runnable接口创建线程");
        }
    }

    public static void main(String[] args) {
         implementRunnable task = new implementRunnable();
         new Thread(task).start();
         new Thread(task).start();
    }
}
2
3
4
5
6
7
8
9
10
11
12
13
14
15
# 源码分析
Thread构造方法:
public Thread(Runnable target) {
    this.target = target;
}
2
3
run()方法:
@Override
public void run() {
    if (target != null) {
        target.run();
    }
}
2
3
4
5
6
start()调用和Thread类同样机制,只是最终执行的是Runnable对象的run()。
优势:多个线程可以共享同一个 Runnable 对象,实现资源共享和状态共享。
# 实现 Callable 接口
public class _01CreatThread {

    public static class implementCallable implements Callable<String> {
        @Override
        public String call() throws Exception {
            return "通过实现Runnable接口创建线程";
        }
    }

    public static void main(String[] args) {
         FutureTask<String> futureTask = new FutureTask<>(new implementCallable());
         new Thread(futureTask).start();
         try {
              String result = futureTask.get();
              System.out.println(result);
         } catch (Exception e) {
              e.printStackTrace();
         }
    }
}
2
3
4
5
6
7
8
9
10
11
12
13
14
15
16
17
18
19
20
# 源码分析
Thread 只能直接执行 Runnable 类型的任务,而 Callable 不能直接传给 Thread。
FutureTask 的作用,就是把 Callable 适配成 Runnable,同时还能保存任务结果或异常。
它的类结构:
public class FutureTask<V> implements RunnableFuture<V> {}
public interface RunnableFuture<V> extends Runnable, Future<V> {}
2
Runnable让FutureTask能作为任务传给Thread执行。Future提供get()获取结果的能力(必要时阻塞等待)。
执行逻辑
构造阶段
FutureTask内部持有一个Callable引用。- 由于它实现了
Runnable,可以直接new Thread(futureTask)。
运行阶段
Thread.start()→Thread.run()→ 调用FutureTask.run()。FutureTask.run()内部会主动调用:result = callable.call(); set(result); // 保存结果1
2如果抛出异常,则执行
setException(ex)保存异常。
结果获取
get()方法会检测任务状态,如果还没完成则进入awaitDone()阻塞等待:LockSupport.park(this); // 挂起等待被唤醒1任务完成后,
FutureTask会唤醒等待线程,返回结果或抛出异常。
public V get() throws InterruptedException, ExecutionException {
    int s = state;
    // 直到该任务执行结束 一直处于阻塞
    if (s <= COMPLETING)
        s = awaitDone(false, 0L);
    // 分发返回结果
    return report(s);
}

private int awaitDone(boolean timed, long nanos) throws InterruptedException {
    final long deadline = timed ? System.nanoTime() + nanos : 0L;
    WaitNode q = null;
    boolean queued = false;

    for (;;) {
        if (Thread.interrupted()) {
            removeWaiter(q);
            throw new InterruptedException();
        }

        int s = state;
        if (s > COMPLETING) {
            if (q != null) q.thread = null; // help GC
            return s;
        }
        else if (s == COMPLETING) // 正在设置结果
            Thread.yield();
        else if (q == null)
            q = new WaitNode();  // 封装当前线程
        else if (!queued)
            queued = waiters.offer(q); // 加入等待队列
        else if (timed) {
            nanos = deadline - System.nanoTime();
            if (nanos <= 0L) {
                removeWaiter(q);
                return state;
            }
            LockSupport.parkNanos(this, nanos); // 超时等待
        }
        else
            LockSupport.park(this); // 无限制等待
    }
}
2
3
4
5
6
7
8
9
10
11
12
13
14
15
16
17
18
19
20
21
22
23
24
25
26
27
28
29
30
31
32
33
34
35
36
37
38
39
40
41
42
43
44
Callable+FutureTask= 可返回结果 + 可捕获异常 + 能直接交给 Thread 执行。
# 通知与等待wait()¬ify()
每个 Java 对象都内置了监视器锁,wait() 和 notify() 依赖监视器锁来实现线程同步,因此它们是 Object 类的方法。
# wait() 方法
当一个线程调用共享对象的 wait() 方法时,该线程会进入 等待状态(Blocked)。
线程的唤醒方式:
其它线程调用
notify()或notifyAll()让等待的线程恢复运行。其它线程调用
interrupt()方法中断该线程。
线程在调用
wait()方法时,必须先 获取该对象的监视器锁,否则会抛出IllegalMonitorStateException。获取共享变量的监视器锁的方式
在
synchronized代码块中,使用该共享变量作为锁:synchronized (共享变量) { }1
2
3在
synchronized方法内部调用:synchronized void add (int a, int b) { }1
2
3
虚假唤醒(Spurious Wakeup)
虚假唤醒:线程被 意外 唤醒,导致逻辑错误。
解决方案:使用
while而不是if来检查条件,防止线程被错误唤醒后执行不符合预期的操作。生产者-消费者模型(示例代码)
public void producerConsumerTest() {
    // 共享队列, 生产者和消费者通过 synchronized 拿到该共享变量的监视器锁
    List<Integer> queue = new ArrayList(5);

    // 生产者
    synchronized (queue) {
        // 队列满时不再生产, 通知消费者消费, 防止虚假唤醒
        while (queue.size() == 5) {
            try{
                queue.wait();
            } catch (Exception e) {
                e.printStackTrace();
            }
        }

        // 空闲时生成元素, 通知消费者消费
        queue.add(1);
        queue.notifyAll();
    }


    // 消费者
    synchronized (queue) {
        // 队列空时不再消费, 通知生产者生产, 防止虚假唤醒
        while (queue.size() == 0) {
            try{

                queue.wait();
            } catch (Exception e) {
                e.printStackTrace();
            }
        }

        // 队列中有元素时进行消费
        queue.remove(queue.size() - 1);
        queue.notifyAll();
    }
}
1
2
3
4
5
6
7
8
9
10
11
12
13
14
15
16
17
18
19
20
21
22
23
24
25
26
27
28
29
30
31
32
33
34
35
36
37
38wait()只能释放当前共享变量上的锁
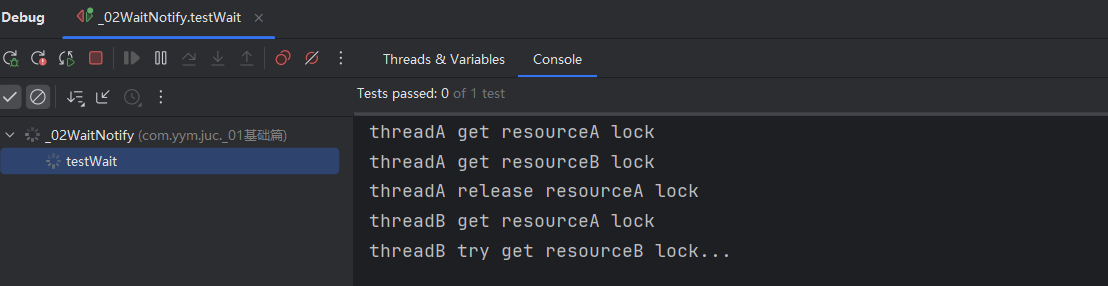
/**
 * 测试wait()只释放当前共享变量的锁
 */
private volatile Object resourceA = new Object();
private volatile Object resourceB = new Object();
@Test
public void testWait() throws InterruptedException {
    // 创建线程
    Thread threadA = new Thread(() -> {
        try {
            // 获取A共享资源的监视器锁
            synchronized (resourceA) {
                System.out.println("threadA get resourceA lock");
                // 获取B共享资源的监视器锁
                synchronized (resourceB) {
                    System.out.println("threadA get resourceB lock");
                    // 线程A阻塞, 并释放获取到的resourceA锁
                    System.out.println("threadA release resourceA lock");
                    resourceA.wait();
                }
            }
        } catch (InterruptedException e) {
            e.printStackTrace();
        }
    });

    Thread threadB = new Thread(() -> {
        try {
            Thread.sleep(1000);
            // 获取resourceA共享资源监视器锁
            synchronized (resourceA) {
                System.out.println("threadB get resourceA lock");

                System.out.println("threadB try get resourceB lock...");
                // 获取resourceB共享资源监视器锁
                synchronized (resourceB) {
                    System.out.println("threadB get resourceB lock");
                    // 线程B阻塞, 并释放获取到的resourceA锁
                    System.out.println("threadA release resourceA lock");
                    resourceA.wait();
                }
            }
        } catch (InterruptedException e) {
            e.printStackTrace();
        }
    });
    // 启动
    threadA.start();
    threadB.start();

    // 等待线程结束
    threadA.join();
    threadB.join();
    System.out.println("test over");
}
1
2
3
4
5
6
7
8
9
10
11
12
13
14
15
16
17
18
19
20
21
22
23
24
25
26
27
28
29
30
31
32
33
34
35
36
37
38
39
40
41
42
43
44
45
46
47
48
49
50
51
52
53
54
55
执行结果: resourceB没有调用wait(), 一直未被释放被ThreadA持有
# wait(long timeout) / wait(long timeout, int nanos)
wait(long timeout)
该方法允许线程进入挂起状态,并在未被
notify()唤醒或中断的情况下,超过timeout时间后自动恢复执行。wait(long timeout, int nanos)
该方法内部调用 wait(long timeout),当 nanos > 0 时,会将 timeout 值加 1。
# notify() / notifyAll()
notify()
该方法用于唤醒一个在共享变量上调用
wait()后进入等待状态的线程,并随机唤醒一个等待线程。notifyAll()
该方法唤醒所有在共享变量上调用
wait()后进入等待状态的线程。
⚠ 注意:与 wait() 方法类似,notify()/notifyAll() 也必须在获取监视器锁的前提下使用,因此必须在同步代码块或 synchronized 修饰的方法内调用,否则会抛出 IllegalMonitorStateException。
/**
 * 测试wait()只释放当前共享变量的锁
 */
@Test
public void testNotify() throws InterruptedException {
    // 创建线程
    Thread threadA = new Thread(() -> {
        try {
            // 获取A共享资源的监视器锁
            synchronized (resourceA) {
                System.out.println("threadA begin wait");
                resourceA.wait();
                System.out.println("threadA end wait");
            }
        } catch (InterruptedException e) {
            e.printStackTrace();
        }
    });

    Thread threadB = new Thread(() -> {
        try {
            synchronized (resourceA) {
                System.out.println("threadB begin wait");
                resourceA.wait();
                System.out.println("threadB end wait");
            }
        } catch (InterruptedException e) {
            e.printStackTrace();
        }
    });

    Thread threadC = new Thread(() -> {
        synchronized (resourceA) {
            System.out.println("threadC begin notify");
            resourceA.notify();
        }
    });
    // 启动
    threadA.start();
    threadB.start();
    Thread.sleep(1000);
    threadC.start();

    // 等待线程结束
    threadA.join();
    threadB.join();
    threadC.join();
    System.out.println("test over");
}
2
3
4
5
6
7
8
9
10
11
12
13
14
15
16
17
18
19
20
21
22
23
24
25
26
27
28
29
30
31
32
33
34
35
36
37
38
39
40
41
42
43
44
45
46
47
48
49
执行流程
- 线程 A 获取
resourceA监视器锁,执行wait()后:- 进入 等待状态(Waiting),释放
resourceA锁。
- 进入 等待状态(Waiting),释放
- 线程 B 获取
resourceA监视器锁,执行wait()后:- 进入 等待状态(Waiting),释放
resourceA锁。
- 进入 等待状态(Waiting),释放
- 线程 C 获取
resourceA监视器锁,执行notify():- 随机唤醒 一个 线程(
threadA或threadB)。 threadC退出同步块后释放resourceA锁。
- 随机唤醒 一个 线程(
- 被唤醒的线程(
threadA或threadB)获取resourceA监视器锁:- 继续执行
wait()之后的代码,打印"threadX end wait"。
- 继续执行
- 另一个线程仍然处于等待状态,因为
notify()只唤醒一个线程。
# join()
join() 的作用是:
阻塞当前线程,直到目标线程执行完毕再继续执行。
/**
 * 测试join()等待线程执行结束
 */
@Test
public void testJoin() throws InterruptedException {
    Thread t1 = new Thread(() -> {
        try {
            Thread.sleep(5000);
        } catch (InterruptedException e) {
            throw new RuntimeException(e);
        }
        System.out.println("child t1 over");
    });

    Thread t2 = new Thread(() -> {
        try {
            Thread.sleep(5000);
        } catch (InterruptedException e) {
            throw new RuntimeException(e);
        }
        System.out.println("child t2 over");
    });

    // 启动子线程
    t1.start();
    t2.start();
    System.out.println("wait child thread over");
    t1.join();
    t2.join();
    System.out.println("all child threads over");
}
2
3
4
5
6
7
8
9
10
11
12
13
14
15
16
17
18
19
20
21
22
23
24
25
26
27
28
29
30
31
解释:
是 主线程 调用的 join(),所以:
t1.join()→ 主线程会等待t1执行完毕;t2.join()→ 主线程会等待t2执行完毕。
# 源码解析
join() 的作用是让 调用线程 等待目标线程执行结束。
它是 Thread 类的一个 final 实例方法,实现原理是:
利用
synchronized锁住目标线程对象,并在其对象监视器上调用wait()挂起调用线程,直到目标线程结束时被唤醒。
public final void join() throws InterruptedException {
    join(0);
}

public final synchronized void join(long millis) throws InterruptedException {
    long base = System.currentTimeMillis();
    long now = 0;

    if (millis < 0) {
        throw new IllegalArgumentException("timeout value is negative");
    }

    // 如果 millis == 0,则一直等待直到线程结束
    if (millis == 0) {
        while (isAlive()) {     // 1. 线程还活着
            wait(0);            // 2. 当前线程(主线程)挂起
        }
    } else {
        while (isAlive()) {
            long delay = millis - now;
            if (delay <= 0) {
                break;
            }
            wait(delay);
            now = System.currentTimeMillis() - base;
        }
    }
}
2
3
4
5
6
7
8
9
10
11
12
13
14
15
16
17
18
19
20
21
22
23
24
25
26
27
28
关键点解析
synchronized锁住的是目标线程对象- 当你调用
t1.join()时,这个方法里的this就是t1对象。 synchronized保证同一时刻只有一个线程能在t1上执行join(),避免状态冲突。
- 当你调用
isAlive()判断的是目标线程是否还在运行- 这是一个 实例方法,判断的是调用它的
Thread对象(这里是t1)的运行状态,而不是调用线程本身。 - 如果
t1还没结束(isAlive() == true),就需要继续等待。
- 这是一个 实例方法,判断的是调用它的
wait()挂起的是调用join()的线程wait()是在 当前执行 join() 方法的线程 上生效的,这里是主线程,而不是t1线程。- 主线程会释放
t1对象的锁,进入t1对象的等待队列中挂起,直到被唤醒。
- 唤醒机制
- 当
t1线程执行完毕后,JVM 会在t1对象上调用notifyAll(),唤醒等待队列中的所有线程(包括主线程)。 - 主线程被唤醒后重新检查
isAlive(),如果为false,就结束阻塞。
- 当
# sleep()
native方法
静态sleep方法, 可以使调用线程暂时让出指定时间的执行权, 但是该线程所拥有的监视器资源以及锁不会让出, 继续被该线程持有, 超出睡眠时间后该线程会进入就绪态, 等待CPU调度。
private Lock lock = new ReentrantLock();
@Test
public void testSleep() throws InterruptedException {

    Thread t1 = new Thread(() -> {
        lock.lock();
        try {
            System.out.println("t1 is in sleep");
            Thread.sleep(10000);
            System.out.println("t1 is awake");
        } catch (InterruptedException e) {
            e.printStackTrace();
        } finally {
            lock.unlock();
        }
    });

    Thread t2 = new Thread(() -> {
        lock.lock();
        try {
            System.out.println("t2 is in sleep");
            Thread.sleep(10000);
            System.out.println("t2 is awake");
        } catch (InterruptedException e) {
            e.printStackTrace();
        } finally {
            lock.unlock();
        }
    });

    t1.start();
    t2.start();
    t1.join();
    t2.join();
}
2
3
4
5
6
7
8
9
10
11
12
13
14
15
16
17
18
19
20
21
22
23
24
25
26
27
28
29
30
31
32
33
34
35
解释:
在这个例子中,Thread.sleep() 使线程进入睡眠状态,但线程所持有的锁并不会被释放,直到该线程完成睡眠并进入就绪态。因此,在 t1 或 t2 中,尽管线程正在睡眠,但它们所持有的 lock 锁会一直保持,直到它们执行完 sleep 并释放锁。
具体来说:
- 锁的行为:线程调用
lock.lock()获取了ReentrantLock,并在进入Thread.sleep(10000)后并未释放锁,导致另一个线程不能获取锁并进入睡眠。此时,线程仍然持有锁,即使它进入了睡眠状态。 - 执行顺序:由于
t1和t2线程在lock.lock()阻塞时相互等待,实际表现为先执行完一个线程(打印完t1 is in sleep和t1 is awake),然后才会执行另一个线程。这是因为持有锁的线程在睡眠期间,锁不会释放,导致另一个线程无法执行。 - 线程调度:尽管线程进入了睡眠状态并让出 CPU 执行权,但由于
sleep并没有释放锁,其他线程无法获得锁并执行,直到当前线程完成睡眠并释放锁。
# yield()
Thread类的静态方法, 当一个线程调用该方法时, 表明让出自己的CPU使用权, 转为就绪态, 进入就绪队列等待被调度, CPU会按照优先级选取一个线程进行调度, 也有可能选出原线程。
# 线程中断
Java 的线程中断是一种线程间的协作机制,线程可以通过中断标识进行自我终止,而不会被强制关闭。线程是否终止完全取决于自身的逻辑控制,而非 interrupt() 方法直接停止线程执行。
void interrupt()
用于设置线程的中断标识,通知线程应当自行处理中断。
boolean isInterrupted():
检测当前线程是否被中断,若已中断返回
true,否则返回false,但不会清除中断标识。boolean interrupted():
作用类似
isInterrupted(),但它是一个静态方法,检查当前调用线程是否被中断,并会 清除 中断标识。
线程中断案例
@Test
public void testInterrupt() throws InterruptedException {
    Thread thread = new Thread(new Runnable() {
        @Override
        public void run() {
            // 当前线程被终止则退出循环
            while (!Thread.currentThread().isInterrupted()) {
                System.out.println(Thread.currentThread() + " ing");
            }
        }
    });
    thread.start();
    Thread.sleep(1000);
    // 中断子线程
    System.out.println("main thread interrupt thread");
    thread.interrupt();

    // 等待子线程执行完毕
    thread.join();
    System.out.println("main is over");
}
2
3
4
5
6
7
8
9
10
11
12
13
14
15
16
17
18
19
20
21
注意事项
- 线程在 阻塞状态(如
sleep()、wait()、join()等)时,若被interrupt(),将会抛出InterruptedException,并 清除 线程的中断标志。 - 因此,在捕获异常后,需要再次设置
Thread.currentThread().interrupt(),确保中断状态得以保留,从而正确终止线程。
# 线程上下文切换
当有优先级更高的线程需要被CPU调度时, 需要保留当前线程的执行现场信息, 再次执行时根据保存的执行现场信息回复执行现场。
# 线程死锁
什么是死锁?
2个及2个以上的线程在执行过程中因争夺资源而互相等待的现象, 在无外力的作用下, 会一直相互等待无法继续运行。
产生死锁的条件
互斥条件
线程对已占有的资源进行排它性使用, 即该资源同时只能被一个线程所占有。
请求并持有条件
一个线程已经持有了至少一个资源, 但又提出了新的资源请求, 新的资源被其它线程占有, 所以当前线程会被阻塞, 又不会释放已持有的资源。
不可剥夺条件
线程获取到的资源在自己使用完前不能被其它线程抢占。
环路等待条件
发生死锁时, 必然出现一个线程资源环形链, 即T0->T1-> ... -> T0, 这些线程相互等待后继线程的资源。
死锁代码案例
private final Object resourceA = new Object();
private final Object resourceB = new Object();

@Test
public void testDeadLock() throws InterruptedException {
    Thread threadA = new Thread(() -> {
        synchronized (resourceA) {
            System.out.println(Thread.currentThread() + "get ResourceA");
            try {
                Thread.sleep(1000);
            } catch (InterruptedException e) {
                throw new RuntimeException(e);
            }

            System.out.println(Thread.currentThread() + "waiting get ResourceB");
            synchronized (resourceB) {
                System.out.println(Thread.currentThread() + "get ResourceB");
            }
        }
    });

    Thread threadB = new Thread(() -> {
        synchronized (resourceB) {
            System.out.println(Thread.currentThread() + "get ResourceB");
            try {
                Thread.sleep(1000);
            } catch (InterruptedException e) {
                throw new RuntimeException(e);
            }

            System.out.println(Thread.currentThread() + "waiting get ResourceA");
            synchronized (resourceA) {
                System.out.println(Thread.currentThread() + "get ResourceA");
            }
        }
    });

    threadA.start();
    threadB.start();
    threadA.join();
    threadB.join();
}
2
3
4
5
6
7
8
9
10
11
12
13
14
15
16
17
18
19
20
21
22
23
24
25
26
27
28
29
30
31
32
33
34
35
36
37
38
39
40
41
42
流程分析:
A线程占有resourceA的监视器锁资源, 睡眠等待B线程占有resourceB的监视器锁资源, 当监视器锁资源被占有时, 该资源将无法被其它线程获取, 当A B线程互相获取对方线程占有资源时就会导致死锁。
# 守护线程与用户线程
在 Java 中,线程分为 用户线程 和 守护线程。JVM 只有在所有用户线程都执行完毕后才会退出,无论是否仍然存在守护线程。 代码示例:
public static void main(String[] args) {

    Thread thread = new Thread(new Runnable() {
        public void run() {
            for (; ; ) {

            }
        }
    });
    // 当主线程(用户线程)结束时, 子用户线程一直在运行, JVM不会退出
    // 设置为守护线程后 主线程结束 JVM自动退出
    thread.setDaemon(true);
    thread.start();

}
2
3
4
5
6
7
8
9
10
11
12
13
14
15
流程分析:
当 thread 未设置为守护线程(默认是用户线程)
- 主线程执行完毕后,
thread仍然是用户线程,因此 JVM 不会退出,会一直运行。
当 thread 设置为守护线程(setDaemon(true))
- 主线程结束后,JVM 检测到没有存活的用户线程,即使
thread仍在运行,JVM 也会自动退出。
注意事项
守护线程的典型应用
- GC线程
- 后台日志记录线程
- 定时任务调度线程
守护线程可能不会执行完整任务
JVM并不会等待守护线程执行结束才退出
# 四、ThreadLocal
在多线程环境中,如果多个线程同时访问共享变量,可能会产生线程安全问题。常见的解决办法是 加锁 或 使用 ThreadLocal 来实现线程隔离。
# 基本概念
ThreadLocal 的作用:
- 为每个线程维护一份独立的变量副本,互不干扰。
- 适用于 线程之间需要隔离,但 同一线程内需要共享 的场景(如用户会话、事务管理等)。
示例:
ThreadLocal<String> threadLocal = new ThreadLocal<>();

public void print(String str) {
    System.out.println(str + ": " + threadLocal.get());
    threadLocal.remove(); // 手动清理,避免内存泄漏
}

@Test
public void testThreadLocalPrint() throws InterruptedException {
    Thread threadA = new Thread(() -> {
        threadLocal.set("threadA local value");
        print("threadA");
        System.out.println("threadA after remove: " + threadLocal.get());
    });

    Thread threadB = new Thread(() -> {
        threadLocal.set("threadB local value");
        print("threadB");
        System.out.println("threadB after remove: " + threadLocal.get());
    });

    threadA.start();
    threadB.start();
    threadA.join();
    threadB.join();
}
2
3
4
5
6
7
8
9
10
11
12
13
14
15
16
17
18
19
20
21
22
23
24
25
26
运行结果:
threadA和threadB各自的值独立,互不影响。
# 实现原理
核心数据结构:
每个
Thread对象内部都有:ThreadLocal.ThreadLocalMap threadLocals; // 普通 ThreadLocal ThreadLocal.ThreadLocalMap inheritableThreadLocals; // InheritableThreadLocal1
2ThreadLocalMap是一个定制版哈希表:- Key:ThreadLocal 对象(弱引用)
- Value:当前线程存储的值
数据存取流程:
# set()
public void set(T value) {
    Thread t = Thread.currentThread();
    ThreadLocalMap map = t.threadLocals;
    if (map != null) {
        map.set(this, value); // this 是当前 ThreadLocal 对象
    } else {
        t.threadLocals = new ThreadLocalMap(this, value); // 第一次使用时创建
    }
}
2
3
4
5
6
7
8
9
- 先取当前线程的
threadLocals。 - 第一次调用会创建一个新的
ThreadLocalMap。
# get()
public T get() {
    Thread t = Thread.currentThread();
    ThreadLocalMap map = t.threadLocals;
    if (map != null) {
        ThreadLocalMap.Entry e = map.getEntry(this);
        if (e != null) return (T)e.value;
    }
    return setInitialValue();
}
2
3
4
5
6
7
8
9
- 先取当前线程的
threadLocals。 - 如果为空,调用
initialValue()初始化(默认null)。
# remove()
public void remove() {
    ThreadLocalMap map = Thread.currentThread().threadLocals;
    if (map != null) {
        map.remove(this);
    }
}
2
3
4
5
6
- 删除当前线程的
threadLocals中,key 为当前 ThreadLocal 的值。 - 在线程池环境中必须手动 remove,以免数据残留到下一个任务。
# 线程隔离性
- 每个线程有自己的
ThreadLocalMap,互不干扰:
Thread A: threadLocals = { ThreadLocal1 -> A1, ThreadLocal2 -> A2 }
Thread B: threadLocals = { ThreadLocal1 -> B1, ThreadLocal2 -> B2 }
2
- ThreadLocal 对象只是 key,不属于任何线程。
get()/set()总是作用于 当前线程 的 ThreadLocalMap。
# 继承性
# 默认(不支持继承)
ThreadLocal<String> tl = new ThreadLocal<>();
tl.set("hello");

new Thread(() -> System.out.println(tl.get())).start(); // null
2
3
4
原因:子线程有自己独立的 ThreadLocalMap,不会读取父线程的数据。
# 支持继承:InheritableThreadLocal
ThreadLocal<String> tl = new InheritableThreadLocal<>();
tl.set("hello");

new Thread(() -> System.out.println(tl.get())).start(); // hello
2
3
4
原理:
- Thread 构造时,会将父线程的
inheritableThreadLocals拷贝到子线程:
if (parent.inheritableThreadLocals != null) {
    this.inheritableThreadLocals = ThreadLocal.createInheritedMap(parent.inheritableThreadLocals);
}
2
3
- 默认
childValue()返回父线程的值,可重写进行定制。
# 注意事项
避免内存泄漏:ThreadLocalMap 的 key 是弱引用,但 value 是强引用,如果不 remove,可能导致值无法被回收(特别是线程池中)。
为什么要用弱引用的 key?
如果
ThreadLocal是强引用:- 你持有 ThreadLocalMap(它在 Thread 里)
- ThreadLocalMap 又强引用 ThreadLocal
- ThreadLocal 又引用 ThreadLocalMap(循环引用)
- 即使外部不再使用 ThreadLocal 对象,它也无法被回收
使用弱引用:
- 当外部不再持有 ThreadLocal 对象时,GC 会回收这个 ThreadLocal
- key 就变成 null(弱引用指向的对象消失)
只在当前线程内访问:不要尝试跨线程获取 ThreadLocal 值。
适用场景:
- 用户会话信息(ThreadLocal 保存当前用户)
- 数据库连接(每线程一个 Connection)
- 日志跟踪 ID(TraceId)
并发基础 →