# Nacos解析
作者:Ethan.Yang
博客:https://blog.ethanyang.cn (opens new window)
# 注册中心的原理
# 注册中心的功能
- 服务实例在启动时注册到服务注册表, 在关闭时注销。
- 服务消费者查询服务注册表, 获得可用实例。
- 注册中心需要调用服务实例的健康检查API验证服务是否存活。
# Nacos 注册中心源码
主要关注三部分源码:
- 服务注册
- 服务地址的获取
- 服务地址变化的感知
# 什么时候完成服务注册
spring-cloud-commons包中有这样一个接口ServiceRegistry, 它是spring-cloud对外提供注册的标准, 集成spring-cloud中实现服务注册的组件都会实现该接口。
package org.springframework.cloud.client.serviceregistry;

public interface ServiceRegistry<R extends Registration> {
    void register(R registration);

    void deregister(R registration);

    void close();

    void setStatus(R registration, String status);

    <T> T getStatus(R registration);
}
2
3
4
5
6
7
8
9
10
11
12
13
spring-cloud-alibaba-nacos-discovery包中有NacosServiceRegistry接口, 用于注册功能, 实现了ServiceRegistry, 那么是在什么时机触发服务注册的动作?
# 集成 Nacos 的过程
spring-cloud-commons 中的META-INF/spring.factories中有自动装配的配置类, 关注下面这个配置类
org.springframework.cloud.client.serviceregistry.AutoServiceRegistrationAutoConfiguration
@Configuration
@Import({AutoServiceRegistrationConfiguration.class})
@ConditionalOnProperty(
value = {"spring.cloud.service-registry.auto-registration.enabled"},
matchIfMissing = true
)
public class AutoServiceRegistrationAutoConfiguration {
@Autowired(
    required = false
)
private AutoServiceRegistration autoServiceRegistration;
@Autowired
private AutoServiceRegistrationProperties properties;

public AutoServiceRegistrationAutoConfiguration() {
}

@PostConstruct
protected void init() {
    if (this.autoServiceRegistration == null && this.properties.isFailFast()) {
        throw new IllegalStateException("Auto Service Registration has been requested, but there is no AutoServiceRegistration bean");
    }
}
}
2
3
4
5
6
7
8
9
10
11
12
13
14
15
16
17
18
19
20
21
22
23
24
在该配置类中, 注入了AutoServiceRegistration实例, 而Nacos的NacosAutoServiceRegistration继承了AbstractAutoServiceRegistration, 而AbstractAutoServiceRegistration继承了AutoServiceRegistration, 同时AbstractAutoServiceRegistration实现了ApplicationListener, 用来监听WebServerInitializedEvent事件, 当webServer初始化结束后调用this.bind(event), 在这个bind方法中会调用this.serviceRegistry.register(), 即调用NacosServiceRegistry的register方法。dubbo和feign都是通过自身的自动装配原理最终调用该方法进行服务注册。
public abstract class AbstractAutoServiceRegistration<R extends Registration> implements AutoServiceRegistration, ApplicationContextAware, ApplicationListener<WebServerInitializedEvent> {
// .........
    public void onApplicationEvent(WebServerInitializedEvent event) {
        this.bind(event);
    }
// ......
2
3
4
5
6
# NacosServiceRegistry 的实现
public class NacosServiceRegistry implements ServiceRegistry<Registration> {
    // .....

    public void register(Registration registration) {
        if (StringUtils.isEmpty(registration.getServiceId())) {
            log.warn("No service to register for nacos client...");
        } else {
            String serviceId = registration.getServiceId();
            String group = this.nacosDiscoveryProperties.getGroup();
            Instance instance = this.getNacosInstanceFromRegistration(registration);

            try {
                this.namingService.registerInstance(serviceId, group, instance);
                log.info("nacos registry, {} {} {}:{} register finished", new Object[]{group, serviceId, instance.getIp(), instance.getPort()});
            } catch (Exception var6) {
                Exception e = var6;
                log.error("nacos registry, {} register failed...{},", new Object[]{serviceId, registration.toString(), e});
            }

        }
    }
    // .....
2
3
4
5
6
7
8
9
10
11
12
13
14
15
16
17
18
19
20
21
22
关注register方法, 其中调用了Nacos Client SDK提供的namingService.registerInstance方法完成服务的注册。
继续跟进registerInstance()
@Override
public void registerInstance(String serviceName, String groupName, Instance instance) throws NacosException {

    if (instance.isEphemeral()) {
        BeatInfo beatInfo = new BeatInfo();
        beatInfo.setServiceName(NamingUtils.getGroupedName(serviceName, groupName));
        beatInfo.setIp(instance.getIp());
        beatInfo.setPort(instance.getPort());
        beatInfo.setCluster(instance.getClusterName());
        beatInfo.setWeight(instance.getWeight());
        beatInfo.setMetadata(instance.getMetadata());
        beatInfo.setScheduled(false);
        long instanceInterval = instance.getInstanceHeartBeatInterval();
        beatInfo.setPeriod(instanceInterval == 0 ? DEFAULT_HEART_BEAT_INTERVAL : instanceInterval);
		// 1. 创建心跳信息实现健康检测
        beatReactor.addBeatInfo(NamingUtils.getGroupedName(serviceName, groupName), beatInfo);
    }
	// 2. 实现服务注册
    serverProxy.registerService(NamingUtils.getGroupedName(serviceName, groupName), groupName, instance);
}
2
3
4
5
6
7
8
9
10
11
12
13
14
15
16
17
18
19
20
先关注心跳机制的实现即beatReactor.addBeatInfo(), nacos为每一个客户端建立发送心跳包的定时任务, 客户端会依照定时任务向nacos发送心跳包, 如果nacos长时间未收到, 则认为客户端出了故障
// 心跳包
POST /nacos/v1/ns/instance/beat
params:
  serviceName=xxx
  groupName=DEFAULT_GROUP
  cluster=DEFAULT
  ip=192.168.0.100
  port=20880
2
3
4
5
6
7
8
9
public void addBeatInfo(String serviceName, BeatInfo beatInfo) {
    NAMING_LOGGER.info("[BEAT] adding beat: {} to beat map.", beatInfo);
    String key = buildKey(serviceName, beatInfo.getIp(), beatInfo.getPort());
    BeatInfo existBeat = null;

    if ((existBeat = dom2Beat.remove(key)) != null) {
        existBeat.setStopped(true);
    }
    dom2Beat.put(key, beatInfo);
    // 定时发送心跳包
    executorService.schedule(new BeatTask(beatInfo), beatInfo.getPeriod(), TimeUnit.MILLISECONDS);
    MetricsMonitor.getDom2BeatSizeMonitor().set(dom2Beat.size());
}
2
3
4
5
6
7
8
9
10
11
12
13
# 基于 Open API 源码分析Nacos服务注册
Nacos除了SDK的方式外, 还提供了Open API请求方式来实现服务注册。
curl -X POST 'http://127.0.0.1:8848/nacos/v1/ns/instance?serviceName=nacos.naming.serviceName&ip=1270.0.1&port=8082'
参考nacos源码: com.alibaba.nacos.naming.controllers.InstanceController#register
@RestController
@RequestMapping(UtilsAndCommons.NACOS_NAMING_CONTEXT + "/instance")
public class InstanceController {
// ....
@CanDistro
@PostMapping
public String register(HttpServletRequest request) throws Exception {
	// 获取serviceName
    String serviceName = WebUtils.required(request, CommonParams.SERVICE_NAME);
    // 获取 命名空间id
    String namespaceId = WebUtils.optional(request, CommonParams.NAMESPACE_ID, Constants.DEFAULT_NAMESPACE_ID);
	// 调用注册实例
    serviceManager.registerInstance(namespaceId, serviceName, parseInstance(request));
    return "ok";
}
// ....
2
3
4
5
6
7
8
9
10
11
12
13
14
15
16
以1.中搭建案例为例, serviceName=sample-provider, namespaceId=public
**registerInstance()**注册实例
// Map<namespace, Map<group::serviceName, Service>> serviceMap (命名空间, <分组:服务名, 服务实例>), 服务实例包括了该服务名下的所有集群和实例
private Map<String, Map<String, Service>> serviceMap = new ConcurrentHashMap<>();

public void registerInstance(String namespaceId, String serviceName, Instance instance) throws NacosException {
	// 1. 创建一个空服务, Nacos控制台服务列表中展示的服务信息, 初始化一个serviceMap
    createEmptyService(namespaceId, serviceName, instance.isEphemeral());
	// 2. 从serviceMap中根据namespaceId serviceName 获取一个service
    Service service = getService(namespaceId, serviceName);

    if (service == null) {
        throw new NacosException(NacosException.INVALID_PARAM,
            "service not found, namespace: " + namespaceId + ", service: " + serviceName);
    }
	// 3.添加服务实例
    addInstance(namespaceId, serviceName, instance.isEphemeral(), instance);
}
2
3
4
5
6
7
8
9
10
11
12
13
14
15
16
createEmptyService
public void createEmptyService(String namespaceId, String serviceName, boolean local) throws NacosException {
    createServiceIfAbsent(namespaceId, serviceName, local, null);
}

public void createServiceIfAbsent(String namespaceId, String serviceName, boolean local, Cluster cluster) throws NacosException {
    // 1. 从serviceMap中根据namespaceId serviceName取出service
    Service service = getService(namespaceId, serviceName);
    // 如果缓存中不存在, 则创建并保存到缓存
    if (service == null) {

        Loggers.SRV_LOG.info("creating empty service {}:{}", namespaceId, serviceName);
        // 创建服务
        service = new Service();
        service.setName(serviceName);
        service.setNamespaceId(namespaceId);
        service.setGroupName(NamingUtils.getGroupName(serviceName));
        // now validate the service. if failed, exception will be thrown
        service.setLastModifiedMillis(System.currentTimeMillis());
        service.recalculateChecksum();
        if (cluster != null) {
            cluster.setService(service);
            service.getClusterMap().put(cluster.getName(), cluster);
        }
        service.validate();
		// 2.将服务实例添加到缓存
        putServiceAndInit(service);
        if (!local) {
            addOrReplaceService(service);
        }
    }
}
1
2
3
4
5
6
7
8
9
10
11
12
13
14
15
16
17
18
19
20
21
22
23
24
25
26
27
28
29
30
311.1 putServiceAndInit
private void putServiceAndInit(Service service) throws NacosException {
    // 将服务缓存到内存Map
    putService(service);
    // 建立心跳检测机制
    service.init();
    // 实现数据一致性的监听
    consistencyService.listen(KeyBuilder.buildInstanceListKey(service.getNamespaceId(), service.getName(), true), service);
    consistencyService.listen(KeyBuilder.buildInstanceListKey(service.getNamespaceId(), service.getName(), false), service);
    Loggers.SRV_LOG.info("[NEW-SERVICE] {}", service.toJSON());
}
1
2
3
4
5
6
7
8
9
101.1.1 putService, 比较简单
public void putService(Service service) {
    if (!serviceMap.containsKey(service.getNamespaceId())) {
        synchronized (putServiceLock) {
            // 判断serviceMap是否包含NamespaceId, 不包含则创建Map<group::serviceName, Service>
            if (!serviceMap.containsKey(service.getNamespaceId())) {
                serviceMap.put(service.getNamespaceId(), new ConcurrentHashMap<>(16));
            }
        }
    }
	// 向对应的Service添加服务实例
    serviceMap.get(service.getNamespaceId()).put(service.getName(), service);
}
1
2
3
4
5
6
7
8
9
10
11
121.1.2 service.init() 心跳, 这边是nacos服务端建立心跳检查机制, 它会检查服务端最近心跳时间, 如果超时了则认为有故障, 并不是客户端向服务端发心跳包
public void init() {

    HealthCheckReactor.scheduleCheck(clientBeatCheckTask);

    for (Map.Entry<String, Cluster> entry : clusterMap.entrySet()) {
        entry.getValue().setService(this);
        entry.getValue().init();
    }
}
1
2
3
4
5
6
7
8
9
addInstance 完成上述步骤后, 添加实例
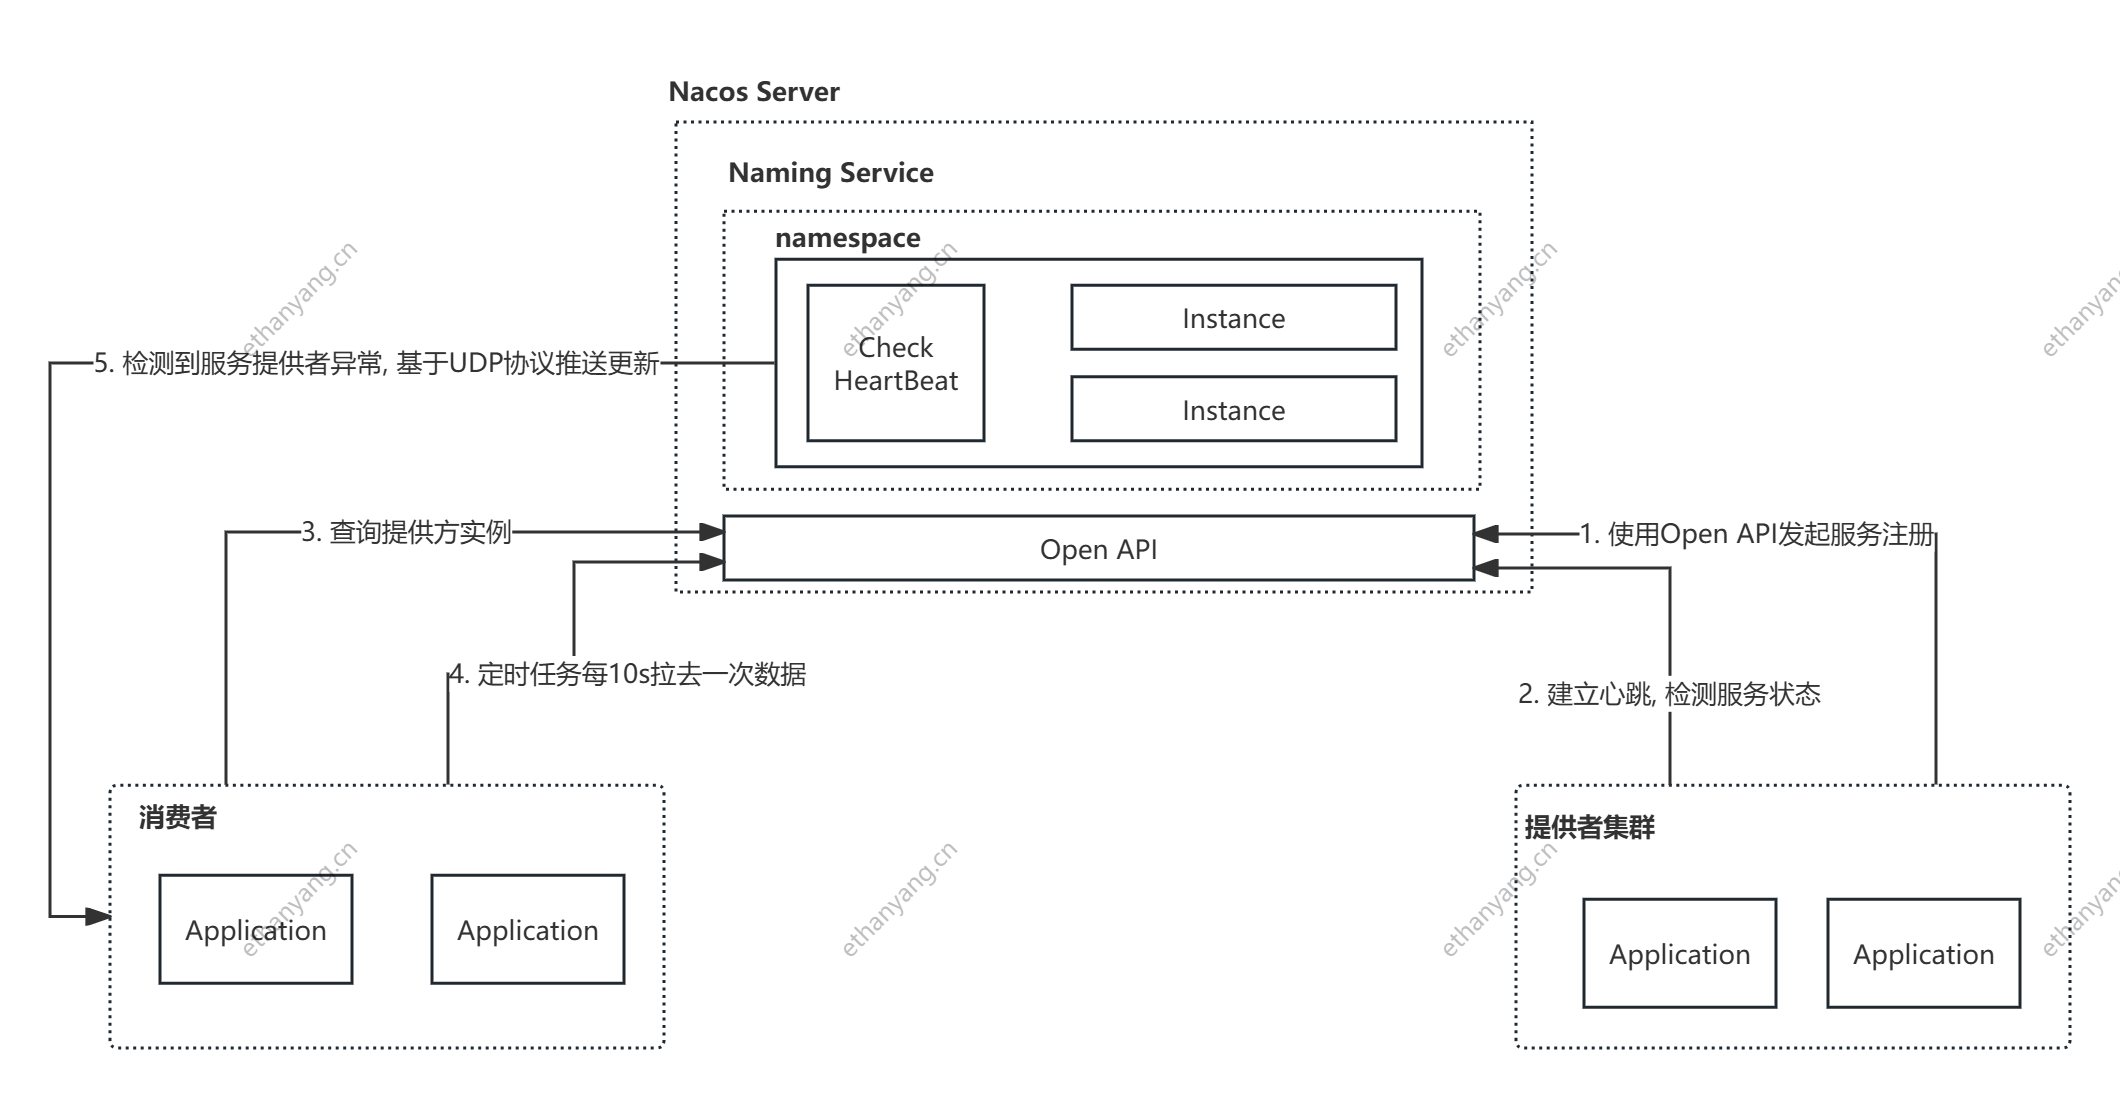
# 服务提供者地址查询
上述分析完服务注册原理, 接下来查看服务地址查询功能, 当客户端启动时会通过SDK和nacos交互, 获取服务提供者的地址
curl -X GET 'http://127.0.0.1:8848/nacos/v1/ns/instance/list?serviceName=test
分析查询服务提供者地址的源码
@GetMapping("/list")
public JSONObject list(HttpServletRequest request) throws Exception {

    // 解析请求参数
    String namespaceId = WebUtils.optional(request, CommonParams.NAMESPACE_ID,
        Constants.DEFAULT_NAMESPACE_ID);

    String serviceName = WebUtils.required(request, CommonParams.SERVICE_NAME);
    String agent = WebUtils.getUserAgent(request);
    String clusters = WebUtils.optional(request, "clusters", StringUtils.EMPTY);
    String clientIP = WebUtils.optional(request, "clientIP", StringUtils.EMPTY);
    Integer udpPort = Integer.parseInt(WebUtils.optional(request, "udpPort", "0"));
    String env = WebUtils.optional(request, "env", StringUtils.EMPTY);
    boolean isCheck = Boolean.parseBoolean(WebUtils.optional(request, "isCheck", "false"));

    String app = WebUtils.optional(request, "app", StringUtils.EMPTY);

    String tenant = WebUtils.optional(request, "tid", StringUtils.EMPTY);

    boolean healthyOnly = Boolean.parseBoolean(WebUtils.optional(request, "healthyOnly", "false"));
	// 返回服务列表
    return doSrvIPXT(namespaceId, serviceName, agent, clusters, clientIP, udpPort, env, isCheck, app, tenant,
        healthyOnly);
}
2
3
4
5
6
7
8
9
10
11
12
13
14
15
16
17
18
19
20
21
22
23
24
doSrvIPXT 返回服务列表, 只用关注核心流程
public JSONObject doSrvIPXT(String namespaceId, String serviceName, String agent, String clusters, String clientIP,
                                int udpPort,
                                String env, boolean isCheck, String app, String tid, boolean healthyOnly)
        throws Exception {
		// 会移除很多无用代码
        ClientInfo clientInfo = new ClientInfo(agent);
        JSONObject result = new JSONObject();
        Service service = serviceManager.getService(namespaceId, serviceName);
		// ....
        List<Instance> srvedIPs;
		// 获取指定服务下的所有实例IP
        srvedIPs = service.srvIPs(Arrays.asList(StringUtils.split(clusters, ",")));
		// .....
        Map<Boolean, List<Instance>> ipMap = new HashMap<>(2);
        ipMap.put(Boolean.TRUE, new ArrayList<>());
        ipMap.put(Boolean.FALSE, new ArrayList<>());
        for (Instance ip : srvedIPs) {
            ipMap.get(ip.isHealthy()).add(ip);
        }

        // ....
    	// 遍历, 完成JSON字符串的组装
        JSONArray hosts = new JSONArray();
        for (Map.Entry<Boolean, List<Instance>> entry : ipMap.entrySet()) {
            List<Instance> ips = entry.getValue();

            if (healthyOnly && !entry.getKey()) {
                continue;
            }

            for (Instance instance : ips) {

                // remove disabled instance:
                if (!instance.isEnabled()) {
                    continue;
                }

                JSONObject ipObj = new JSONObject();

                ipObj.put("ip", instance.getIp());
                ipObj.put("port", instance.getPort());
                // deprecated since nacos 1.0.0:
                ipObj.put("valid", entry.getKey());
                ipObj.put("healthy", entry.getKey());
                ipObj.put("marked", instance.isMarked());
                ipObj.put("instanceId", instance.getInstanceId());
                ipObj.put("metadata", instance.getMetadata());
                ipObj.put("enabled", instance.isEnabled());
                ipObj.put("weight", instance.getWeight());
                ipObj.put("clusterName", instance.getClusterName());
                if (clientInfo.type == ClientInfo.ClientType.JAVA &&
                    clientInfo.version.compareTo(VersionUtil.parseVersion("1.0.0")) >= 0) {
                    ipObj.put("serviceName", instance.getServiceName());
                } else {
                    ipObj.put("serviceName", NamingUtils.getServiceName(instance.getServiceName()));
                }

                ipObj.put("ephemeral", instance.isEphemeral());
                hosts.add(ipObj);

            }
        }

        result.put("hosts", hosts);
        if (clientInfo.type == ClientInfo.ClientType.JAVA &&
            clientInfo.version.compareTo(VersionUtil.parseVersion("1.0.0")) >= 0) {
            result.put("dom", serviceName);
        } else {
            result.put("dom", NamingUtils.getServiceName(serviceName));
        }
        result.put("name", serviceName);
        result.put("cacheMillis", cacheMillis);
        result.put("lastRefTime", System.currentTimeMillis());
        result.put("checksum", service.getChecksum());
        result.put("useSpecifiedURL", false);
        result.put("clusters", clusters);
        result.put("env", env);
        result.put("metadata", service.getMetadata());
        return result;
    }
2
3
4
5
6
7
8
9
10
11
12
13
14
15
16
17
18
19
20
21
22
23
24
25
26
27
28
29
30
31
32
33
34
35
36
37
38
39
40
41
42
43
44
45
46
47
48
49
50
51
52
53
54
55
56
57
58
59
60
61
62
63
64
65
66
67
68
69
70
71
72
73
74
75
76
77
78
79
80
# Nacos服务地址动态感知原理
客户端在首次获取地址列表后, 还需要实时的知道生产者地址列表的变动, 基本原理如下
- 客户端发起事件订阅后, HostReactor中有一个UpdateTask线程, 每10s发送一次pull请求, 获得服务端最新地址列表
- 服务端和服务提供者维持了心跳检测, 一旦服务提供者异常, 会push消息给Nacos客户端, 也就是服务消费者
- 服务消费者收到请求后, 使用HostReactor中解析消息, 并更新本地服务地址列表
# 配置中心
# springCloud Nacos配置中心基本使用
# 基本使用
参考项目根目录/nacosConfig项目
注意点
- 需要有bootstrap.yml文件存放Nacos配置信息, 该文件是优先于application.yml加载, 项目启动时需要加载Nacos配置信息
- Ncos控制台配置管理新增配置
- prefix表示Nacos控制台配置列表的Data Id
测试案例
@SpringBootApplication
public class NacosConfigApplication {
    public static void main(String[] args) {

        ConfigurableApplicationContext context = SpringApplication.run(NacosConfigApplication.class, args);
        System.out.println("++ NacosConfigApplication start ++");

        String info = context.getEnvironment().getProperty("info");
        System.out.println("nacos 配置info: " + info);
    }
}
2
3
4
5
6
7
8
9
10
11
# 动态更新配置
在配置中心上修改配置的值, 应用程序需要感知值的变化。
测试代码, 变更nacos配置
@SpringBootApplication
public class NacosConfigApplication {
    public static void main(String[] args) throws InterruptedException {

        ConfigurableApplicationContext context = SpringApplication.run(NacosConfigApplication.class, args);
        System.out.println("++ NacosConfigApplication start ++");
        while (true) {
            String info = context.getEnvironment().getProperty("info");
            System.out.println("nacos 配置info: " + info);
            Thread.sleep(2000);
        }

    }
}
2
3
4
5
6
7
8
9
10
11
12
13
14
# Nacos Config 自定义 Namespace、Group 和 Data ID 配置详解
Namespace(命名空间)命名空间用于实现 配置隔离,常用于不同环境(开发、测试、生产)的区分或者多租户系统。
配置方式:
在 Nacos 控制台创建命名空间,获取对应的
namespace-id在
bootstrap.yml(或bootstrap.properties)中添加:spring: cloud: nacos: config: namespace: your-namespace-id # 是 ID,不是命名空间名称1
2
3
4
5
Group(分组)Group是在一个命名空间中对配置的再分组,默认是DEFAULT_GROUP,常用于:- 相同环境下不同项目配置的逻辑隔离
- 对某一类配置进行集中管理
配置方式:
在 Nacos 控制台中新建配置时填写 Group 名称
在
bootstrap.yml中添加:spring: cloud: nacos: config: group: CUSTOM_GROUP1
2
3
4
5
6多个微服务共享同一个命名空间,但配置不同
通常会结合业务线分组,如:
ORDER_GROUP、USER_GROUP
Data ID(配置标识)Nacos 中配置项的唯一标识,通常与
application-name和profile相关,格式如下:${prefix}-${spring.profiles.active}.${file-extension}1默认:
prefix = spring.application.namefile-extension = yml(或properties)
举例:
如果配置如下:
spring:
  application:
    name: nacos_config
  profiles:
    active: dev

spring:
  cloud:
    nacos:
      config:
        file-extension: yml
1
2
3
4
5
6
7
8
9
10
11
12那么会去加载:
Data ID: nacos_config-dev.yml1你也可以自定义
prefix:spring: cloud: nacos: config: prefix: custom-name1
2
3
4
5最终加载的就是:
custom-name-dev.yml1一般不同环境的集群都是分开的 命名空间用来区分不同项目, group区分不同项目的服务, Data ID为唯一标识
# Nacos Config 实现原理解析
Nacos针对配置管理提供了4种操作, 分别是获取配置 监听配置 发布配置 删除配置, 并且都提供了 SDK和Open API的方式进行访问。简单来说就是提供了对配置的CRUD 和 配置的动态监听。
# 配置的CRUD
服务端对配置进行存储以及持久化, 客户端只需要通过接口从服务器端查询到相应的数据然后返回
# 动态监听之Pull Push
客户端和服务端之间的数据交互有2种方式: Pull Push
Pull 表示客户端从服务端主动拉取数据
一般来说需要客户端定时从服务端获取数据, 当数据更新不频繁时客户端属于无效拉取, 当数据频繁更新时因为是定时拉取数据的实时性没法得到保证。
Push 服务端需要和客户端维持长连接, 如果客户端数量较多, 服务端需要耗费大量的内存资源来保存每个连接, 并且需要有心跳机制检查连接状态
Nacos采用的是长轮询机制, 客户端长轮询的方式定时发起pull请求, 检查服务端配置是否发生变化, 如果变化了则请求直接返回, 否则服务端会对这个请求挂起
# spring cloud如何实现配置的加载
Spring提供了Environment, 项目启动时会把配置加载到Environment中, 创建Bean时可以通过@Value将属性注入, 并且提供getProperty(String key)获取配置属性;
为了实现Nacos的动态配置加载, 需要将远程服务的配置加载到Environment, 当配置更新时需要将配置更新到Environment中
PropertySourceBootstrapConfiguration
该类是一个启动环境配置类, 其中有一个initialize方法会调用PropertySourceLocator.locate加载远程服务的配置信息, 具体的加载流程如下
Spring Boot启动时, 在SpringApplication.run执行时, 会初始化环境配置
public ConfigurableApplicationContext run(String... args) {
// ....
try {
    ApplicationArguments applicationArguments = new DefaultApplicationArguments(args);
    // 初始化环境配置
    ConfigurableEnvironment environment = this.prepareEnvironment(listeners, applicationArguments);
   // ....
}
1
2
3
4
5
6
7
8prepareEnvironment方法会发布一个环境配置事件
private ConfigurableEnvironment prepareEnvironment(SpringApplicationRunListeners listeners, ApplicationArguments applicationArguments) {
    // ....
    listeners.environmentPrepared((ConfigurableEnvironment)environment);
   // .....
    return (ConfigurableEnvironment)environment;
}
1
2
3
4
5
6BootstrapApplicationListener 会监听该事件
← Dubbo 解析